
One of the most common mistakes when attempting to recreate a Japanese classical style tanto is to caricature or over exaggerate certain design elements while entirely missing others. The Japanese aesthetic is subtle and nuanced, millimeter differences can make or break the lines of a blade or koshirae.
A subtle curve is almost always more pleasing than a straight line and the eye should always trump the hard math when it comes to aesthetics, but the math is an important starting point and sticking close to it is the fastest way to the aesthetic. The illustrations and notes in this article should provide some checkpoints for the design process and work flow, as well as some elements to observe when studying antiques.
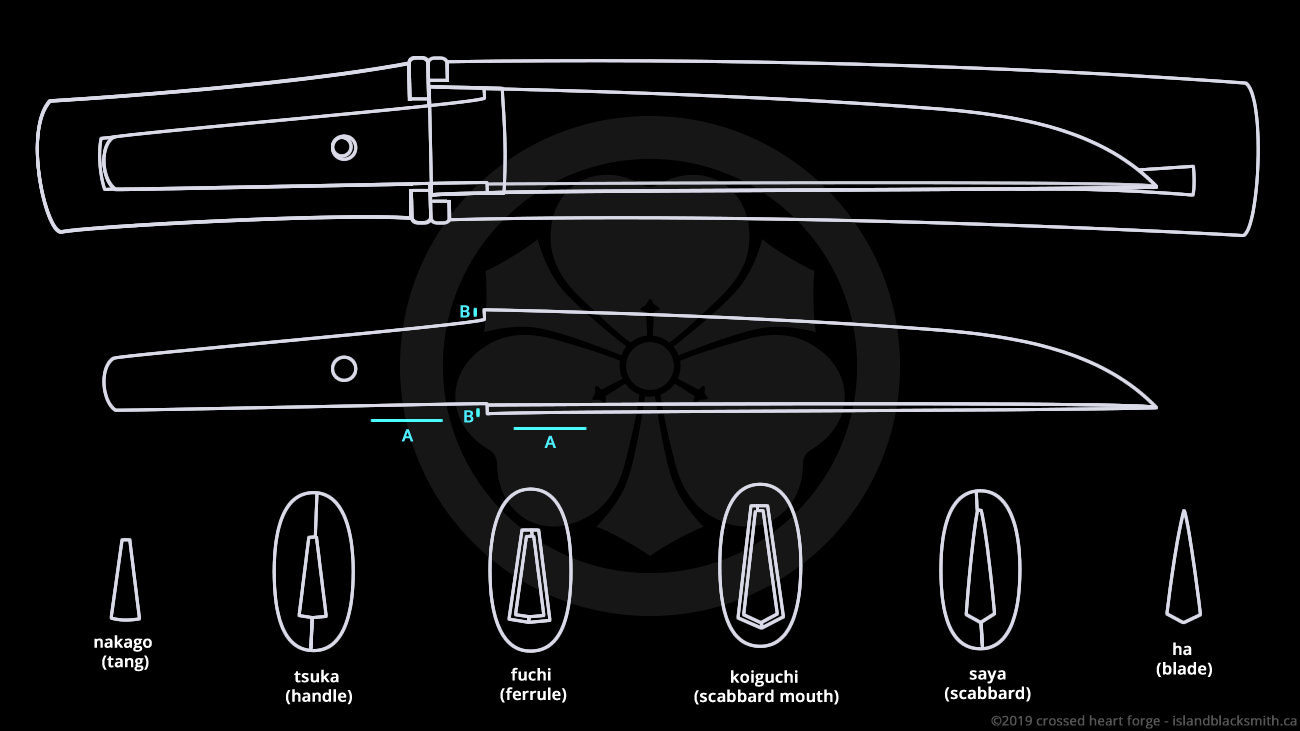
(spoiler alert: there is no kink between handle and blade, and tanto spines are generally straight)
Overview
The mune (spine of the blade), particularly the section just next to the machi (notches) is very important as its general direction sets the placement and direction of many aspects of tanto geometry:
- the spine of the tang flows from it
- the machi are perpendicular to it
- the spine of the habaki flows from it
- the shoulder of the habaki is perpendicular to it
- the spine of the handle flows from it
- the spine of the saya flows from it
- the kurikata is perpendicular to it
…and from the above almost all other points and alignments are derived, such as the fuchi, koiguchi, etc.
Ha / Blade
*Note that for the sake of clarity the blade has been shortened to about 2/3 the length it should be for standard tanto proportions.

B. the machi (notches) are parallel to one another, similar in size, and are perpendicular/90 degrees to the mune near the machi (A)

D. habaki no ha (edge of the habaki) should flow parallel from the line of the edge with no sudden kink or bend (notice how this also causes the tang to be closer to the mune than the ha of the koiguchi rather than centered)
E. the (base of the habaki) is perpendicular/90 degrees to the mune near the machi (A)
Tsuka / Handle

F. the habaki/blade should be visually centered in the fuchi/tsuka, the kasane of the blade and shape of habaki/mune can change this greatly so don’t just use math but a careful eye
G. don’t cut in too much on the tsuka belly in relation to the edge and habaki (D) or it will visually throw off the look of the centering (F) again

H. the whole line along the tsuka no mune should flow from the whole line of the mune
J. the approximate plane of the kashira (pommel) should be perpendicular to the general flow of the tsuka no mune (H), while also considering how it interacts with the edge side of the tsuka
Saya / Scabbard

K. though the blade is uchizori (straight/opposite curving), some curve flowing from the tsuka no mune (A) is added to the saya
L. the approximate plane of the kojiri (tip of the scabbard) should be perpendicular to the general flow of the saya no mune (K), which is also relatively parallel with the edge side of the saya


The flow and line must look continuous and smooth (particularly along the mune) whether the blade is in the saya or out, as if the parts have grown out of one another.

Summary
Four principles/areas of comparison to focus on during the design and workflow might be stated this way, in order of operations:
1. make the tang flow from the mune
2. make the machi and habaki perpendicular to the mune
3. make the tsuka flow from the mune
4. make the saya align with the mune and flow from the tsuka
Additional Notes
Careful observers will note several other subtle details within the illustrations which may be helpful in the design process.
- even though the mune has slight negative sori, the interaction of the iori mune (peaked spine) and the bevels causes the blade to appear to have a slight amount of sori nearer the tip as a counterbalance
- there is a very slight space inside the tsuka at the end of the nakago to allow compression to occur on the nakago-mune and nakago-ha without bottoming out
- the nakago-no-mekugi-ana is larger than the tsuka-no-mekugi-ana (at least a little, sometimes a fair bit) to allow a backwards “drawbore” pull rather than a “jam” in the nakago (5-6mm is common, the Aizu Shintogo is 7mm, usually smiths will just pick a size from a mentor or kata and stick with it for everything)
- there is a small oil trap carved in the omote at the tip of the saya to draw away and collect any excess oil that may build up
- taper and waisting in the shape of the tsuka should be subtle rather than abrupt and extreme to avoid interrupting the flow of the shape
- the cross section of tsuka and saya should have a fairly narrow oval profile for both ergonomics and aesthetics
- the mekugi should be visually centered in the tsuka and generally are placed quite close to the fuchi
- the kurikata is quite close to the koiguchi on tanto saya, and the smaller the knife the closer it must be for balance
- shorter tanto often have saya that are slightly (up to a few cm) longer than the blade to provide visual and physical balance when closed (there is a limit and care should be taken not to overstep the balance)


