Process: Forging a Field Kotanto

This blade was named Sunagawa (砂川, sand river) because the texture of the blade and the flowing edge of the hamon are reminiscent of the bank of a calm river. It was hand forged in a charcoal swordsmith style forge powered by fuigo box bellows and water quenched with clay, an outdoor knife that has the foundation of the Japanese sword. The final piece has a hamidashi mounting is in the rustic kura (蔵, storehouse) style and includes antique fittings from swords carried long ago.

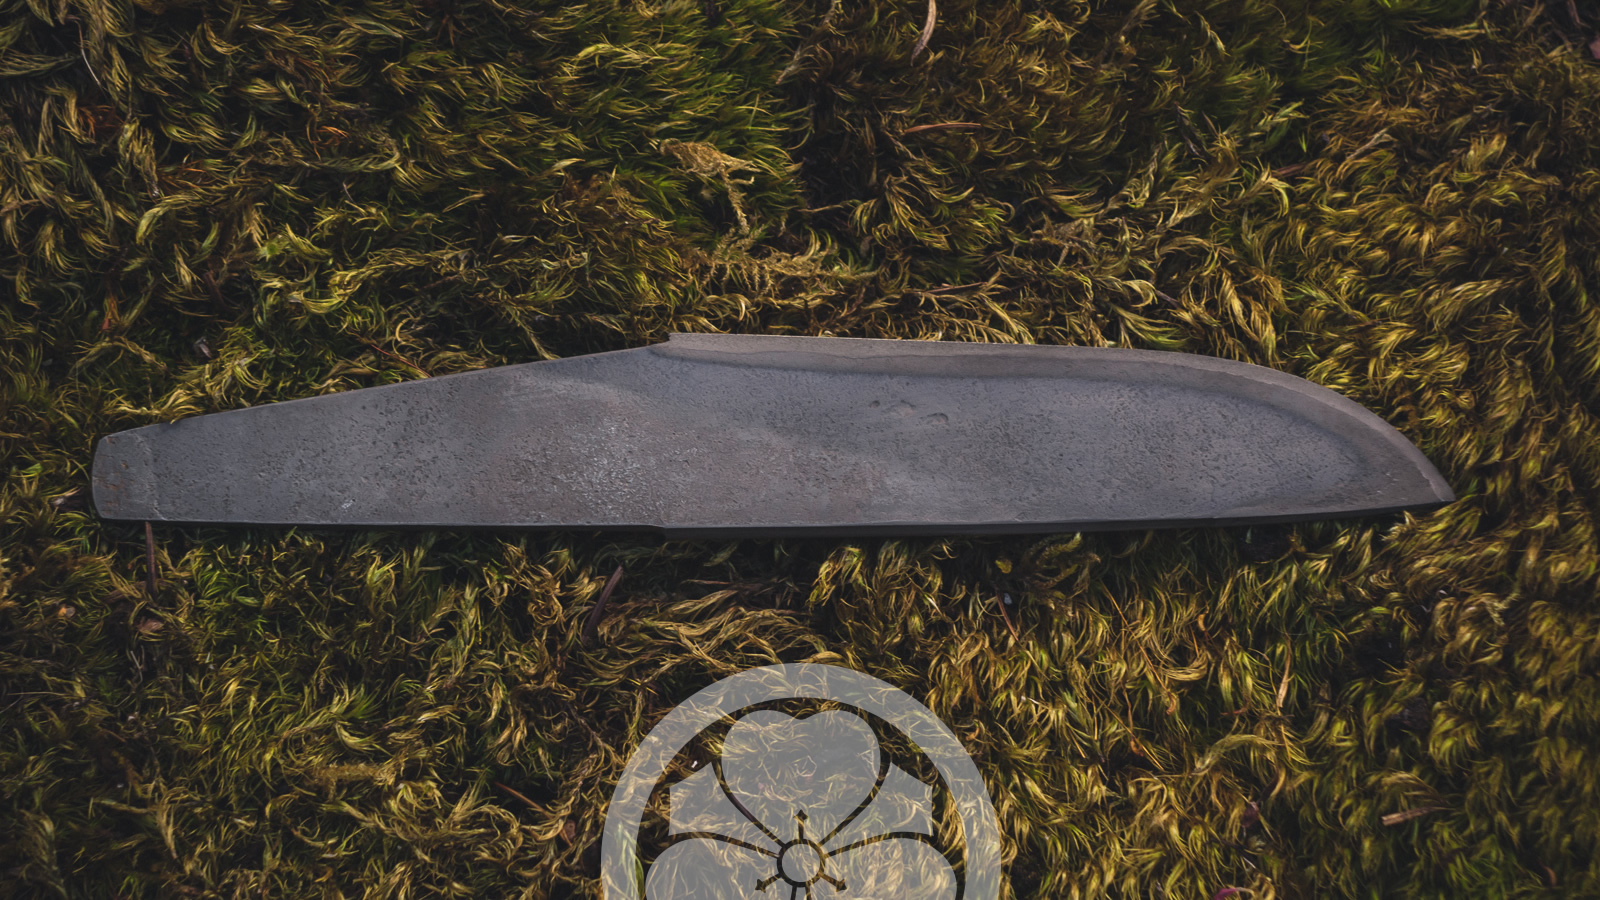
This article highlights the forging of a small utility blade from a reclaimed pre-1960s cultivator tine. The photos document the dimensions and shape of the piece at various stages from starting bar to finished and hardened blade. A few notes are provided to outline the process and steps.


scroll down or jump to the sections below:

Steel: Raw materials
Sunobe: Forging the preform
Hizukuri: Forging the bevels
Arashiage: Rough shaping
Tsuchioke: Applying the clay
Yaki-ire: Hardening the blade
Hamon: A look at the results


Steel: Raw materials

This blade was forged and yaki-ire performed at the museum forge. It began as a pre-1960s (integral) cultivator tine used to work a farmer’s land a generation or more ago. Parts of the same tine were used for a mountain kotanto and a sunnobi tanto.

Island Blacksmith: Charcoal forged knives from reclaimed steel.
The starting point as a pre-1960s (integral) cultivator tine, shown with the remaining original bar split in half.
Island Blacksmith: Charcoal forged knives from reclaimed steel.
If the steel is very old it can be helpful to remove any seriously deep pits, if done before forging the surface doesn’t have to be flat, just enough to prevent forming cold shuts.

Sunobe: Forging the preform

Sunobe is a pre-form that allocates steel for the tang and blade, sets the taper for the spine and tang, and determines the final thickness and width as well as approximate length. The more care that is given to the sunobe the more accurate and clean the final blade will be. In a swordsmithing license test the judges may stop the student at sunobe if they already see that the final blade will not be correct.

The step prior to sunobe is called wakashinobe (lengthening the bar/billet), which may take more or less time depending how close the starting bar is to the proportions of sunobe.

Island Blacksmith: Charcoal forged knives from reclaimed steel.
The first stage is wakashinobe (lengthening the bar), in this case the dimensions are already close so some allocation and taper is already occurring.
Island Blacksmith: Charcoal forged knives from reclaimed steel.
The distal taper towards the tip and tang is beginning to form.
Island Blacksmith: Charcoal forged knives from reclaimed steel.
A decision is made about the location of the machi (notches) and which will be the edge and spine.
Island Blacksmith: Charcoal forged knives from reclaimed steel.
The tang of the sunobe is forged.
Island Blacksmith: Charcoal forged knives from reclaimed steel.
Very slight machi (notch) locations are forged, the spine is facing downwards.
Island Blacksmith: Charcoal forged knives from reclaimed steel.
The taper of the spine of the tang.
Island Blacksmith: Charcoal forged knives from reclaimed steel.
The tip is hot cut on an angle using an old triangle file for a hardy.
Island Blacksmith: Charcoal forged knives from reclaimed steel.
The edge is downward in this photo, the angled cut off will form the last part of the spine.
Island Blacksmith: Charcoal forged knives from reclaimed steel.
A small amount of cleaning up the lines of the spine and edge is still required.
Island Blacksmith: Charcoal forged knives from reclaimed steel.
The tip partially turned up (now sitting edge upward).
Island Blacksmith: Charcoal forged knives from reclaimed steel.
The sunobe tapers from the machi towards both ends.
Island Blacksmith: Charcoal forged knives from reclaimed steel.
The completed sunobe has the correct proportions and is ready to bevel.

Hizukuri: Forging the bevels

If the sunobe is formed correctly and accurately, hizukuri should produce a blade of correct proportions. When steel is forged it does not compress, it simply moves outward from the hammer blows. This means that thinning along one edge of the sunobe will cause a curve to form in the blade. It can be counteracted in advance, afterward, or during each heat by the type and direction of the blows. At some point the edge will become too thin to correct so it is good practice to keep it relatively under control at all times.

During hizukuri a thin layer of water is used on the anvil to cause steam explosions to clean the forge scale off the hot steel. The oxide scale does not soften like the steel and will be driven into the surface if it builds up too thickly. Water forging helps prevent build up and produces a better finished surface.

Island Blacksmith: Charcoal forged knives from reclaimed steel.
The iori-mune (peaked spine) is forged in first, before the bevels begin.
Island Blacksmith: Charcoal forged knives from reclaimed steel.
Downward curving the tang in advance to counteract the forces of bevelling.
Island Blacksmith: Charcoal forged knives from reclaimed steel.
The tang is finished bevelling, next is the blade (note the edge is facing upwards).
Island Blacksmith: Charcoal forged knives from reclaimed steel.
The bevels increase the width noticably and straighten out the curvature.
Island Blacksmith: Charcoal forged knives from reclaimed steel.
The shape is finished, some lower temperature planishing will further smooth the surface.
Island Blacksmith: Charcoal forged knives from reclaimed steel.
Normalizing the steel once the beveling is finished to remove any stresses remaining from forging.
Island Blacksmith: Charcoal forged knives from reclaimed steel.
Using water on the anvil during hizukuri has kept the oxide scale from building up and scarring the surface.
Island Blacksmith: Charcoal forged knives from reclaimed steel.
This is the surface and form after hand hammer work only, it should be within a mm or two of final dimensions. In this case it needs to be quite accurate in order to fit an antique habaki.

Arashiage: Rough shaping

There is a proper order for arashiage (rough filing), moving around the profile and working from one step to another. First the spine, then the mune machi, then the nakago mune, then the edge, then the ha machi, then the nakago no ha, then the tip of the tang. In this case the bevels will remain as forged and the shape is already very accurately forged so very little filing is required.

Island Blacksmith: Charcoal forged knives from reclaimed steel.
The profile is cleaned up by hand filing in the machi (notches) and drawfiling the spine.
Island Blacksmith: Charcoal forged knives from reclaimed steel.
At this point the edge is about 1mm thick on the blade and about 1.5mm along the edge of the tang, as forged (if the blade were for polishing they would start slightly thicker, around 2mm).
Island Blacksmith: Charcoal forged knives from reclaimed steel.
The profile after filing, bevels will remain as-hammered.
Island Blacksmith: Charcoal forged knives from reclaimed steel.
The spine has more reverse sori (negative curvature) than necessary, to counteract the effects of hardening later.
Island Blacksmith: Charcoal forged knives from reclaimed steel.
A look at the surface after filing the profile.
Island Blacksmith: Charcoal forged knives from reclaimed steel.
The edge after filing (note that the tip thickens slightly to assist heat retention during yaki-ire).
Island Blacksmith: Charcoal forged knives from reclaimed steel.
The spine after filing, the mune machi is the thickest point and tapers in three directions.
Island Blacksmith: Charcoal forged knives from reclaimed steel.
Some draw filing in the sen dai (staple vise) to establish the location of the final edge, still about 0.5mm thick.
Island Blacksmith: Charcoal forged knives from reclaimed steel.
The profile after drawfiling the edge.
Island Blacksmith: Charcoal forged knives from reclaimed steel.
The filed bevel angles are very close to the forged bevel angles.
Island Blacksmith: Charcoal forged knives from reclaimed steel.
The blade is ready for yaki-ire, it should be rubbed with ashes to remove any traces of oil from handling before applying the clay.

Tsuchioke: Applying the clay

The clay is a mask to delay the cooling of the body of the blade by about a half-second longer than the edge. This will cause a different crystal structure to form in each part of the blade, producing a very hard edge (martensite) and a very tough resilient spine (ferrite/pearlite). The mixture is made from natural clay, charcoal powder, and polishing stone powder and the main purpose is that it needs to remain in place without shrinking while drying and without cracking while heating.

It is applied about 1.5mm thick and starts from a point on the tang where the heat will not reach, covering the spine and everything outside of the intended hamon area. Most modern low-alloy carbon steels will harden a small distance under the clay, some more than others, so this must be taken into consideration. It can be dried overnight or over the coals in the forge before yaki-ire is attempted.

Island Blacksmith: Charcoal forged knives from reclaimed steel.
Adjusting the clay mixture by adding varying amounts of charcoal powder, polishing stone powder, and clay.
Island Blacksmith: Charcoal forged knives from reclaimed steel.
The clay mixture should be smooth, fine, and more like pancake batter than bread dough.
Island Blacksmith: Charcoal forged knives from reclaimed steel.
Applying the clay mixture in preparation for yaki-ire (quenching/hardening).
Island Blacksmith: Charcoal forged knives from reclaimed steel.
The clay can be slowly dried over coals or left overnight to dry.
Island Blacksmith: Charcoal forged knives from reclaimed steel.
The quick dry method is not quite as safe as the overnight or the slow charcoal method but should work if the mixture is correct.

Yaki-ire: Hardening the blade

Yaki-ire (quenching/hardening) is the most stressful step for the steel, if any one of several variables is off the blade could crack rendering the project into scrap. Careful heating to the lowest temperature possible to achieve hardness in the whole hamon area is the goal. Accurate and even temperature along the hamon area, not overheating the spine, and correct water temperature are some of the details to watch.

After the hamon area reaches critical/non-magnetic temperature it is plunged into water to cool. The remaining clay is removed and the hamon placement and hardening checked before some slight yaki-modoshi (tempering) over the flames and possibly more later if needed.

Island Blacksmith: Charcoal forged knives from reclaimed steel.
The fire for yaki-ire should be large and deep to assist with even heating along the edge.
Island Blacksmith: Charcoal forged knives from reclaimed steel.
An example of a blade immediately after quenching and before removing the clay.
Island Blacksmith: Charcoal forged knives from reclaimed steel.
This steel takes an exceptionally well-placed and lovely hamon, a tough blade with a hard edge.
Island Blacksmith: Charcoal forged knives from reclaimed steel.
The blade profile after removing the clay, hardening has removed the excess downward spine curve.
Island Blacksmith: Charcoal forged knives from reclaimed steel.
The turnback on the tip is narrow and well-shaped.
Island Blacksmith: Charcoal forged knives from reclaimed steel.
A look at the clay placement as related to the draw-filed edge.

Hamon: A look at the results

A good hamon should be well proportioned, have a look of control and evenness, with a delicate turnback at the tip, and running off just beyond the machi. In the case of older classical tanto the style was often suguha, relatively straight and narrow hamon that have a reserved, elegant feel to them. This particular steel takes a hamon very close to the clay placement, allowing a high degree of control over the shape and form.

Island Blacksmith: Charcoal forged knives from reclaimed steel.
After soaking in vinegar water to clean off any remaining forge scale. The smooth hammered surface and lovely proportioned hamon are further complimented by an angled mizukage (water shadow) showing another internal dynamic of heating and cooling in the yaki-ire process.
Island Blacksmith: Charcoal forged knives from reclaimed steel.
Mizukage translates “water shadow” and is an interesting phenomenon, likely related to a heat gradient in the steel at the time of quenching.
Island Blacksmith: Charcoal forged knives from reclaimed steel.
A look at the omote side, this particular steel allows lovely hamon control and proportion.

Specifications

長さ/刃長 Nagasa (blade length): 111mm
重ね/元重 Motokasane (spine thickness): 5mm
元幅 Motohaba (blade width): 29mm
反り Sori (spine curve): uchizori (reverse) with slight drop point
中心/茎 Nakago (tang length): 79mm

形 Katachi (geometry): hira-zukuri, mitsu-mune, with slight ubuha
刃文 Hamon (edge pattern): suguha
帽子/鋩子 Boshi (tip pattern): ko-maru
中心/茎 Nakago (tang): futsu, kuri-jiri, one mekugi-ana
銘 Mei (signature): mumei (unsigned)

Island Blacksmith: Charcoal forged knives from reclaimed steel.

Island Blacksmith: Charcoal forged knives from reclaimed steel.

See more photos of the finished work.
Read about classical tanto blade geometry.
Read about classical tanto tang and machi geometry.