Classical Tanto Construction: Habaki の Machigane

Habaki is a non-ferrous collar for the blade that strengthens the base of the tang and holds the blade tightly in the scabbard. Often made of copper, it is composed of a large jacket and a small wedge that are forged and filed to shape and then soldered together before polishing and patinating. The topic of this post will focus solely on the geometry of the small machigane wedge as it can be a difficult component to study as well as illustrate due to its location and size.

This discussion will not cover all variations of the habaki and its construction, but will provide a general starting point based on my current work flow and understanding. As with all aspects of classical tanto geometry, the habaki is informed by both functional requirements and traditional aesthetics. The focus of this discussion will be the the method of calculating the compound triangular prism shape as it relates to the tang, edge, and hamachi.


For most knifemakers, habaki are one of the most difficult obstacles to the crafting of a classically styled tanto. Though requiring a venture into the realm of silversmiths, habaki are absolutely necessary for nihonto, both from the standpoint of aesthetics, and for the proper construction of a saya, or wooden scabbard.


Tanto HabakiのMachigane Form

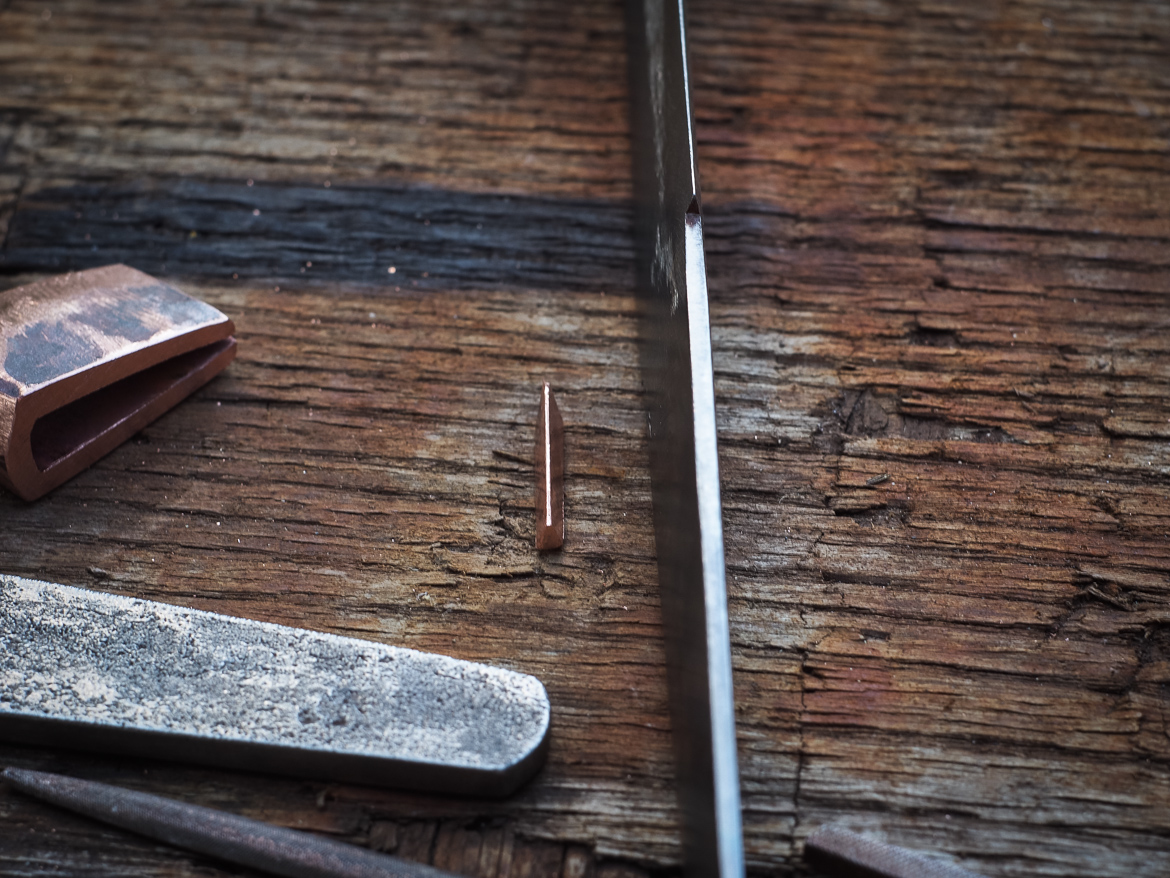
Besides working at a small scale, the difficulty of creating machigane is that it is a compound triangular prism with unusual tapers and planes. Fortunately, each of those sides and corners is based on a real measurement that can be taken from the blade and tang with a little spacial-visual understanding. The simplest way to picture the size and shape of the machigane is to imagine extending the blade edge back from the hamachi along the bottom of the tang using copper instead of steel.

The bottom of the prism is a rectangle based on the width of the nakago no ha (edge of the tang), which should be a constant width. The top of the prism should be a peak that follows the direction the edge would take if it continued back into the tang, making allowance for the addition of some fumbari. The triangle face at the front should match the inside face of the hamachi (edge notch), and the back triangle face will be formed between the nakago no ha and the termination of the imaginary extended edge. Perhaps some photos will help clear things up…

Island Blacksmith: Charcoal forged nihonto made from reclaimed and natural materials using traditional techniques
This is the easiest way to picture the machigane, a copper extension of the edge along a properly formed tang. The front face rests squarely in the hamachi and all the way along the machigane fills the gap between nakago no ha and the projected extension of the edge if it were to continue. Fumbari, the slight swelling that gives the blade a strong “stance” must be accounted for as well. Note that in this photo the machigane is still slightly oversize as it sits above the edge line.
Island Blacksmith: Charcoal forged nihonto made from reclaimed and natural materials using traditional techniques
Looking towards the hamachi, the size and shape of the front triangle face is visible.
Island Blacksmith: Charcoal forged nihonto made from reclaimed and natural materials using traditional techniques
The inside of the jacket shows approximately what the back triangle face will look like, note that it is taller but not wider than the front face.
Island Blacksmith: Charcoal forged nihonto made from reclaimed and natural materials using traditional techniques
The peak of the prism is a line like the edge of the blade. The goal is to close the habaki as close to the final size as possible so that there will be only a thin part of the machigane visible, or even just the single line of the jacket meeting itself. This edge and joint will also depend on the degree of ubuha that the blade has.
Island Blacksmith: Charcoal forged nihonto made from reclaimed and natural materials using traditional techniques
The bottom rectangle matches the nakago no ha. Note that the tang in this photo has yet to be cleaned up and still has a slight swell behind the machi, the finished bottom edge of the tang should be the same thickness from hamachi to tip.
Island Blacksmith: Charcoal forged nihonto made from reclaimed and natural materials using traditional techniques
The two side faces of the prism flow between all the established lines, corners, and points discussed above. They will not be perfect planes due to the math involved, but forging during the fitting will match up all the inside surfaces of the habaki before soldering.

Assembly & Soldering

While not the subject of this discussion, the set up for soldering provides some more views of how all the parts fit and align. Some notes on soldering include to clean and flux all surfaces (eg. file and borax paste), to use oxidized or rusted steel wire to create some tension on the parts, to place the solder inside and allow it to flow downwards into the joints, to keep the heat and exposure to oxygen under control, and to air cool before any further working.

One important point of creating habaki is that they must be formed and soldered just slightly undersize, sliding up and stopping with a few millimeters or so remaining before the machi. This is so when they have been soldered and are in a soft, annealed state, they can be cold forged to stretch them to the proper size, work hardening them at the same time.


Island Blacksmith: Charcoal forged nihonto made from reclaimed and natural materials using traditional techniques
it is far easier to remove excess machigane later than to file down the whole habaki if it is too short. Note that this is where the habaki will sit when finished, but it will be soldered at a smaller size (hence the protrusion of the machigane peak). It does, however, illustrate clearly how the machigane stops short, allowing the hamachi to be hidden and supported inside the habaki.
Island Blacksmith: Charcoal forged nihonto made from reclaimed and natural materials using traditional techniques
This is a makeshift oxidized wire stand that will provide tension to the joint and keep the habaki sitting upright in the charcoal forge during soldering. All joints are fluxed and the silver solder strip is in place. When soldering in a charcoal forge, an “oven” of charcoal surrounds the piece, the air blast is kept as low as possible, and the work is set at the opposite side of the fire, away from a direct air blast to avoid oxidization.


Island Blacksmith: Charcoal forged nihonto made from reclaimed and natural materials using traditional techniques
After soldering, cold forging to fit, and rough clean up. The triangle face that sits against the hamachi is clearly visible.
Island Blacksmith: Charcoal forged nihonto made from reclaimed and natural materials using traditional techniques
This view shows the rectangle that rests against the nakago no ha (edge side of tang). All flux must be removed from the inside to avoid scratching the blade, soaking in a vinegar water solution will eventually dissolve the glass-like remnants.

Island Blacksmith: Charcoal forged nihonto made from reclaimed and natural materials using traditional techniques

see this tanto in progress

see the finished work


Posted

in

by